Showing posts with label pink. Show all posts

Thursday, June 28, 2012

A Soap A Day Project: Day 17

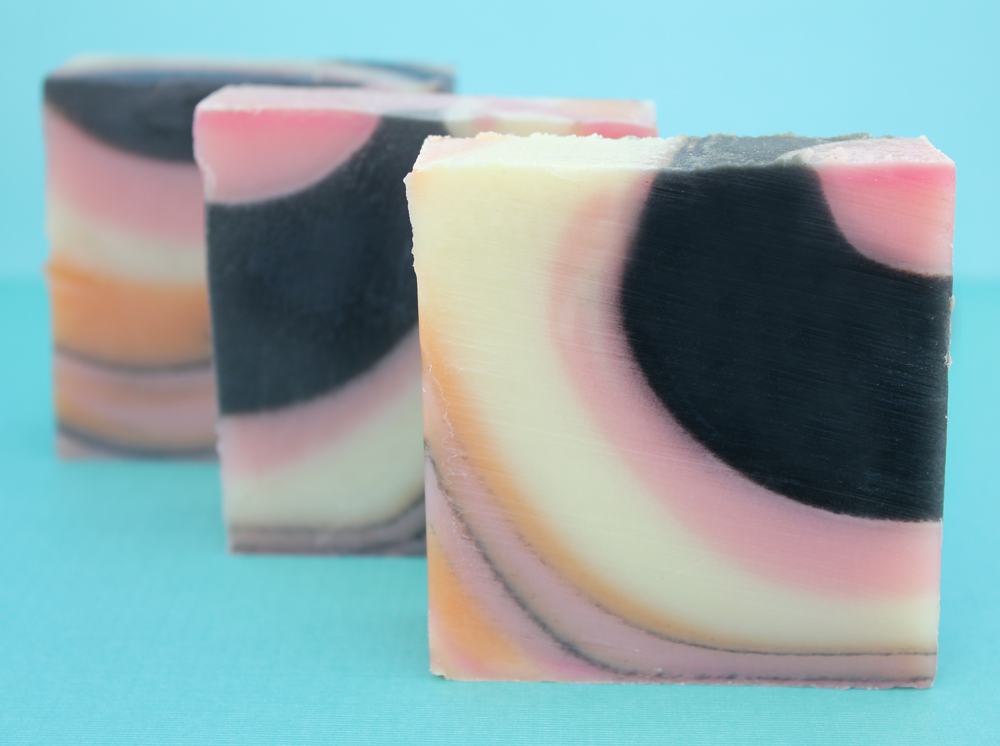
The metal table outside has this pattern and I have been wanting to do something with it for a while now!
a couple messy areas but that's ok!
The comment below reminded me that I should pay homage to the color inspiration! A cake from GloriousTreats.com


Tuesday, June 26, 2012

A Soap A Day Project: Day 15

Soap From Friday! This actually took the weekend to make. The reason: I was making it in between other production so I only had time to pour one color each hour. Making just one soap like this is actually more difficult than making a whole loaf. In a loaf mold this would be a cross section, but because this was the flat top of one soap, I had to pour the color, then cut a strip and pour color next to it, then cut, then pour, then cut, and so on.
So, the whole time I was making this I was thinking about how inefficient it was to create. Efficiency is not the point of this project so I wasn't worried about that, but all weekend I thought about ways to make my processes more efficient so I can produce more with the same or fewer resources, including less man power, simpler but equally as gorgeous design, less time, and less packaging. I especially focused on packaging and resources as they are my little hang up with making soap.


Water: I think I can save 75% - 80%!
Water is a HUGE concern for me. We are so wasteful with potable water! I live in a dessert and people here want to make it look like the UK with all the grass and other water sucking plants that we maintain. My husband and I rent a house and it has a lawn which makes me a little sick. REALLY! There isn't much I can do about it except let it go brown and dormant during the summer, which I do, and which annoys my neighbors. Oh, well, I am not wasting 100 gallons of drinking water a week to maintain a lawn that I don't use and that shouldn't be planted here anyway. When I see hug complexes with rolling emerald patches of lawn it hurts me inside. REALLY!

I currently use too much water to wash soap making dishes. How can I run the water less?
1) Soak, melt and pour melting containers immediately when the soap is still liquid. Run the sponge over them to clean with the soaking water and then rinse quickly! Or, let the soap set up a little then peel it out of the container so there is less to wash.
2) For Cold Process, soak the utensils in soapy water and again, clean off with the soaking water then rinse quickly.
This is all to prevent me running the water as I am scrubbing with the sponge.
3) For the Cold Process pots, let them sit overnight until the soap sets up and then scrape most of it off. They can then be soaked and cleaned with the method above, but I can do it outside over the lawn and ornamental plants. I have done this before when soaping in 5 gallon buckets and the soap doesn't seem to harm the plants so I am just going to to this with ALL of my CP batches. I am going to say this will keep the tap off 75% - 80% more than it currently is!

This will take more time, and I will need more pots and containers as some will have soap setting up in them when I need a pot for a new batch of soap. Saving potable water is worth a little extra time, but I can still be productive while pots and containers are soaking. As with everything it will be more efficient in an assembly line fashion so I will just make washing an assembly line task!

Packaging is the next task to overhaul! I am moving towards all biodegradable and less less less! Stay Tuned!

Friday, June 22, 2012

A Soap A Day Project: Day 13

I like working with all clear soap and brightly colored embeds! Gotta LOVE clear M&P!
Ok, I have officially lost track - I have random bars of soap laying around that I have to take pictures of! Not that it is that hard - the pics are all pretty standard! This is the soap I made for Wednesday so I guess I am only a day behind.

This soap really made me mad! I had thin little delicate strips of soap cut and I could not for the life of me get them to stay upright in the mold so they all fell over! My big clumsy fingers got in the way, I tried tweezers but my hands weren't steady enough. It could be that it was about 2 hours past my bedtime once I was finished with this. Also, once I poured the clear soap all the embeds moved out of place. You probably can't really tell but there should have been thinner stripes and more of them, very carefully placed in straight rows. I am going to try this one again for sure!
So I am a day behind and I find myself working on things for too long, in order to get a result that may not be better. This is a pattern! I spent a really long time researching new packaging yesterday rather than filling my last order for the week so now I am going to have to work for part of tomorrow. I don't NEED to redo my packaging but I NEED to make soap for my customers! I was just more interested in the packaging at the time! Silly me! FOCUS FOCUS!

Wednesday, June 13, 2012

A Soap A Day Project: Day 7

I am doubling up on soap posts today since the light went down yesterday and I couldn't get my pictures taken! I do all of my photos in natural light so if I don't do it early the light gets lost! This is a visual representation of the all day headache I had yesterday. :) WARNING: Don't stare too long! I definitely got out of my comfort zone with the bright neon colors but I like it!
 I love how the backing pink color creates a neon glow in the white soap dish!
NOTE: I am traveling until Monday but hope to still do my Soap A Day but I may have to post all of them when I get back. I will try and post quick pictures from my phone on my Facebook page!

Friday, June 8, 2012

A Soap A Day Project: Day 3

Loving the neon green with the dark peach color combo!

I tried a new technique with this one and it isn't what I visualized in my head but that is ok! I am not sure what I was thinking with the strips in the background. Sometimes I just don't know when to stop and have to learn to let things be! The technique I used on the first two would have been better so I will switch back to that and keep this in the back of my mind for when it is needed.

This just reminds me that I have to focus on what I am good at! I strayed last night and tried making some bath bombs and I was having a hard time with the press I was using. (The recipe was fabulous though!) Mind you, I am going to get it right eventually and add them to my line eventually but I can keep the project close and bring it out when I get a marketing strategy in full swing! I have a little adventure to find some local retailers I am embarking on tomorrow and I will tell you all about it!

Do any of you have a technique for approaching Local Retailers that you would like to share?

In the mean time I am trying to do one thing a day to promote my business and am trying to get better at my customer service! Those of you who get an email back a week or two later know what I am talking about!

A side note - there is a reason I have suddenly started stressing about my business but I will tell that story later. :)

So far these posts have gotten a great response! I hope to keep em' coming!

Thursday, June 7, 2012

A Soap A Day Project: Day 2

These circles are so small that the were about the size of my finger tip!
I already almost failed! This soap, supposed to be finished yesterday, got finished this morning because I really had to get to bed last night. I was just too tired! I did stay awake for another hour reading one of my Dresden novels. When I closed my eyes I wondered if I could have kept going with the soap and was just lazy, or if stopping was the right thing to do to give myself time to wind down. We can't always work at 100%, 100% of the time. You will probably be more productive working at 100% in short bursts and then giving yourself sufficient time to recover.

Monday, May 7, 2012

Customer Review: Very berry Sugar Whipped Soap

A few weeks ago I sent out a request for customer reviews and the response was great! If you are interested in doing a review just send your name and address to erin@naiadsoaparts.com with a list of three products you would like to review. I will choose one on the list that needs feedback and ship it to you for your feedback!

Today we have a guest post from one of my customers Gail Kahles reviewing Very Berry Sugar Whipped soap. She was nice enough to include some photos too! Thanks so much Gail!

Gail writes: Naiad’s packaging is always pretty, and this product is no exception. The label is classy, featuring a sweet graphic and an eye-catching font. As is true for all Naiad products, this would make an exquisite gift.

I was surprised how hefty the 10 oz. jar felt when I picked it up. There’s a large amount of luscious soap in here! Once opened, I discovered an exact replica of berry frosting, right down to the glistening sugar. Mmmm, mmmm, I almost went searching for a spoon! Sniffing deeply, I detected a light mixed berry scent along with a vibrant clean smell. Delicious!

I first used this soap straight out of the jar and directly onto my skin. It had a gentle scrubbing effect and made me feel very indulged. Honestly, I don’t think I’ve ever enjoyed any soap or scrub as much as this one. It’s smoooooth and moisturizing perfection! I later tried it on a bath poof, where it made volumes of rich, luxurious lather. Oh my, this product is truly heavenly!

If I were forced to criticize, I’d have to say I prefer a stronger fragrance. I love the uplifting mix of fresh berries so much that I want to enjoy more of it!

Monday, April 16, 2012

Contest and Give Away: Name this Soap!

This is a new Limited Edition Soap I am releasing for this summer! The scent is exotic tropical fruit of guava and passionfruit, and pineapple citrus with a hint of peach. I love the variation in the bars - all of these bars came from the same batch of soap! Available for purchase May 7, 2012

If you have an idea for a name for this soap please leave it in a comment below. The person who comes up with the name we choose will receive a free bar of this soap plus a 10 oz Sugar Whipped Soap of the same scent!


Details:
• Contest ends Monday April 30th
• You may leave multiple comments as long as the comment contains a naming idea for this soap.
• The winning name will receive a bar of this soap plus one jar of Sugar Whipped Soap in the same scent.
• An additional winner will be chosen at random to receive one bar of this soap.
• One prize per winner.

Tuesday, May 3, 2011

New Market Specials 5.3.11

The Market Special is a limited edition soap sold by the slice without a box similar to how you may buy your soap in the market! These soaps are still 4.25 - 4.5 oz in weight but only $5.50 per bar!

This week Bromeliad and Wild Orchid and Lemon!
 Shop all Market Specials

Bromeliad: a light floral with hints of ginger and cotton candy sugar. The bright colors through the middle reminded me of vibrant Bromeliad flowers!
 Wild Orchid and Lemon: A bright sharp floral with lemon zest and coconut milk. If you like the English Apothecary Lemon Gardenia you will love this scent!

Wednesday, March 31, 2010

the Pink and Green Sale

In Honor of over 200 fans on the Naiad Soap Arts Facebook Fan Page, and my favorite color combo, I am having a sale!
For the PINK and GREEN sale - anything in my Etsy shop that is either PINK or GREEN or BOTH with be marked 20% off starting April 1st through April 5th! For Instance:

Happy Shopping!

Sunday, March 14, 2010

French Macarons First attempt!


You have all seen them - those delightful pastel confections in gorgeous colors and flavors that intrigue and tempt, and are notoriously know for being difficult to make! Did I mention they are my favorite cookie? (thank you Debbie at Soapylove) Well, I had to try making them of course! It all started when I got my daily email from Rare Bird Finds featuring "I (heart) Macarons" by Hisako Ogita. I immediately followed the link and bought the book! It is filled with beautiful pictures and easy to follow photographed instructions making the whole endeavor seem possible, so this weekend I dove in!

I pondered over the myriad color/flavor combos and came up with a simple Pistachio macaron with a Framboise buttercreme filling! All of the ingredients were easily found at Trader Joes and luckily I have a scale since I measured the ingredients by weight to be precise!

Readying the ingredients was a snap - but them came the "Macronnage", the step where perfectly stiff egg whites are mixed with the dry ingredients: Ground almonds and powdered sugar (and ground pistachios in this case). This is the make or break step, mix too much or too little and the tops of the macarons could be cracked, they could lack feet (the little ridge at the bottom which it MUST have to be classified a macaron) or could have a dull appearance instead of a shiny hard shell.  The instructions said to do 15 strokes with a rubber spatula to mix the batter to the right consistency - I did exactly 15 strokes and the batter looked perfect.
When I piped the batter however it looked thin whereas in the pictures from the book the batter looked stiffer - perfectly round dots with a little height and dome to the top. I thought I was finished but I moved forward! They dryed for 45 minutes and then I popped them in the oven. The directions said a 375 degree oven for 15 minutes. I did this and the first baking sheet was overbaked (but with feet to my delight!). The second baking sheet I dropped the heat to 300 and baked for 7 minutes and they were underbaked. The third sheet was the charm at 300 degrees for 10 minutes with a rotation half way through baking! The hardest part was getting them off of the parchment paper so next time I will use silicone baking mats for sure!
Notes for next time:
1) the directions did not say this but while doign research I found that you should use dried egg whites, that is you separate the whites and let them sit out for 24-72 hours to reduce the moisture while still maintaining the protein bonds. I cheated and microwaved then for 15 seconds. Next time I will do it the right way and hopefully the batter will be a bit more stiff. (wish the book would have mentioned that)
2) use silicone baking mats.

Monday, January 11, 2010

I ♥ Beets!


I had never had a beet until a few months ago, as my memories are of the red root and bright pink hard boiled eggs in a magenta pickling broth, not so appealing at 5 or 6 years old, and the experience turned me off of beets until they were recently recommended by a friend! Now I absolutely love them, am tickled by the pretty color and since then, have found out just about all I could about the nutritious pink food! Beets are like the Superman of veggies! According to articles I have read they are high in vitamins A, B1, B2, B6, and C. Put it up against Spinach and other greens for iron content and Beet Greens are the winner pound for pound! Betacyanin, which gives beets their red color is apparently a superhero against cancer!

Oh, back to the eggs. I wonder if my Mom knew those bright pink pickled eggs and beets are a harmonious combo - Apparently the Choline in eggs and the Betaine in Beets work together to fight inflammation linked to heart disease, Osteoporosis and type 2 diabetes! I don't know what Choline and Betaine are but that is pretty cool!

There are a few precautions as well. Due to the oxalates those with kidney stones or gallbaldder stones should consume with caution and probably if your doctor says it is ok.

I am not an expert and don't want to make claims but you can read all about it on The Worlds Healthiest Foods or by doing a web search for beets  - you will find a lot of resources!

AND - you may see a little red hmm, hmm, down there after eating beets. This is called beeturia and it is a harmless condition that happens to those who cannot metabolize the betalain that makes the beets red. 10-14% of the population suffers from this.

I love that you can eat the whole plant, root and greens - very economical!

Beets are in season in Sothern California right now. You want to look for small unwrinkled beets when buying, though I had some beets the size of softballs last night and they were wonderful - tender and sweet! The were being sold by the bunch rather than the pound so I just bought the Heaviest bunch there was!

I like a simple preparation for the beets and greens, as they have natural sugar and salt so little to no seasoning is required!

Simple Beet salad with wilted greens and walnuts:
It is a great snack on its own but I love to serve this with grilled Firm Tofu drizzled
with Soy Vay Island Teriyaki sauce.
It goes well with the sweet sauce and would also be wonderful with a side of
Cottage Cheese or a portion of grilled Chicken!

• I started with a bunch of organic beets - about 2 lbs with greens, a bunch of organic swiss chard
(6 cups), and a bunch of organic Mustard (6 cups). I strongly recommend organic produce here!

• separate the beets from the greens, peel, slice into 1/2 inch pieces, place in the bottom of a baking pan, drizzle with about 2 T. of olive oil, a pinch of coarse sea salt (optional) and roast at 400 degrees for about 45 minutes to 1 hour. You want them fork tender.

If you want to cut some of the fat out, you may also clean them, wrap in tin foil with the skin on and roast until fork tender. (I just like drizzling with olive oil because all the TV cooks do it and it makes me feel fancy) Remember to peel them after roasting!

• While the beets are roasting rinse your greens well! Take out the tough middle stalks on the leaves, either by cutting, or tearing leaves away from stalk. I like to cut to avoid bruising the greens. Rough chop the greens to about 1 - 2  inch pieces.

• Once the beets are done quickly wilt the greens in 1T of olive oil on high heat. This will take about 2 minutes. Beets greens and chard have a fair amount of sodium naturally so season with a little freshly ground pepper.

• Top with sliced beets and about 1/4 cup of chopped walnuts or almonds! Serves 3-4! make sure everyone gets a couple beet slices! I say this because I like to keep them for myself. :)


Enjoy!

Friday, January 8, 2010

Tutorial: Sweet Treats Mini Soap Chocolates


I always love to give handmade goodies for holidays and I think these little soap chocolates are the perfect Valentine's Day gift for a sweetheart or even friends and co-workers. They are simple and budget friendly! I hope you enjoy it!

Materials:
• 12 oz. of Bright White glycerin soap
• 8 oz. of Naturally Clear plus 4 oz. of Bright White glycerin soap
• two, 2 cup microwave safe glass measuring cups
• Wilton Bite size brownie squares pan
Strawberry Fragrance Oil
Dark Rich Chocolate Fragrance Oil
Non Bleed Red Liquid Color
Brown Oxide Liquid Color
• two, 2 or 4 oz. Plastic Squeeze Bottles
• Rubbing Alcohol in a Spray Bottle
a simmering pan of water (optional)

Directions:
1) Melt 12 oz of white soap in microwave - about 2 minutes. Add 6 drops of Non bleed red color, less or more depending on how light or dark you would like your pink, and 4 ml of Strawberry Fragrance. Set aside
2) Melt 8 oz of clear soap base plus 4 oz. of white soap base in microwave - about 2 minutes, Add 30 drops of Brown Liquid Oxide, more or less depending on how light or dark you would like the chocolate color, and 4 ml of Rich Dark Chocolate Fragrance Oil. 

here are the colors you are looking to get

3) Pour about 1 oz of pink soap into one squeeze bottle and about 1 oz of Chocolate Brown soap into the other squeeze bottle. If the soap starts to set up, place the bottles in a pan of simmering water until the soap is liquid again.
4) Working in only 12 of the mold cavities, make thin lines of soap across the mold in a diagonal motion using one of the soap colors. You may get a little pooling depending on how hot the soap is – this is ok! Repeat in the remaining 12 cavities with the other soap color. Let set for about 5 minutes.

I make the lines across the entire mold but if you are less messy than me,  you can concentrate the lines within the individual cavities. The lines will just be thicker if you do that.

5) Make sure the soap in the glass containers is at about 120 degrees, not too hot to melt the soap and not too cool to look goopy. Let cool or heat as needed. Spray the brownie mold with a generous amount of rubbing alcohol coating all of the soap lines. 
6) Pour the pink soap in the mold cavities with chocolate brown stripes and the chocolate brown soap in the mold cavities with the pink stripes. Spray with rubbing alcohol to remove air bubbles and let set about 1 hour until the soap is completely firm.


7) Pop out of the mold and you are done!

Variation: Once you get the hang of the squeeze bottles you can make other designs such as hearts, swirls or dots.


Packaging ideas:
Stack soaps in a wide mouth glass apothecary jar. Decorate with an antique key to your heart and a handmade heart tag and finish with ribbon!
 
4 soaps fit perfectly in a 3.25 in square by 1 inch box. Add a little paper shred in the bottom of the box, place soaps, and finish with a ribbon and handmade tag.


Add pink wood shred to the bottom of a shallow tin and fill with soaps! What  a nice surprise when the lucky recipient opens the box!


resources:

LinkWithin

Related Posts with Thumbnails