Showing posts with label tutorials. Show all posts

Thursday, November 12, 2015

Easy DIY Flower Gift tags!

These pretty paper flower gift tags are inexpensive and perfect for any occasion! This easy project is kid friendly as well!
You'll need:
• 1/8 inch hole punch
• Paper gift tags 3inches long or larger
• Paper flowers
• Brads in silver or gold


Step 1: Punch a hole about 1-1.25 inches from the end of your gift tag. I am using a 3 inch gift tag and a 1/8 inch hole punch.


Step 2: Choose 3-4 paper flowers in different sizes. Starting with the smallest flower, slide onto the brad. The flowers should come with pre punched holes to make this easy! NOTE: the flowers will have a front and back, The front if the side cubed up and you will want to put the brad through the front side so the petals curve upwards.


Step 3: put the brad through the hole in the tag and bend the legs of the brad flat. NOTE: You can cover the legs of the brad with a little white sticker or round kraft sticker!


Thursday, December 22, 2011

Last Minute handmade gift ideas

I often find myself making last minute gifts during the holidays - they are perfect for those friends who have everything and are nice to have around in case there are any unexpected guests during the holidays! Here is what I did this year:


1) Flavored liquors make for pretty gifts when packaged in corked bottles! You can get the recipes for these on my blog here. There is still time to make the Chai Whisky which only needs 24 hours to infuse! I used frosted glass cosmetic bottles that I had left over from some R&D but you can find Cork top bottles at most craft stores. Mason jars would also be lovely for packaging. You can make up sticker labels, or a raffia tie with a tag and the name of the infusion would be perfect too!


2) Handmade chocolates are always a hit! Get some nut and dried fruit trail mix and add to melted chocolate to make fruit and nut bars. Trader Joe's Omega Trail mix works well! Wrap in tin paper and a cigar band label or tag label.Good quality chocolate can be found at most health food and natural food stores or get melting chocolate from the your local craft store.  
how to to temper chocolate

For chocolate clusters get some raw nuts, candy them (great recipe here), and then dip the nuts into chocolate and spoon onto parchment paper until set! I made some yummy ones with white chocolate, candied almonds and freeze dried blueberries from Trader Joes! They go great with a blueberry vodka spritzer! (wink)
3) You can NEVER go wrong with homemade marshmallows! I used an easy recipe from the NPR website and the book "Make the Bread Buy the Butter". I added some cardamom to mine, or you can add a tablespoon or two of cocoa powder for chocolate marshmallows or even some peppermint extract! Bags can be found at your local craft store.

Monday, March 21, 2011

Column Swirl

So, this video of a painting by Holton Rower has been going around and made it into the soap community via Soapylove's Facebook page where Debbie noted it might be inspiring for Cold Process soap makers. Boy was she right! Amanda Griffin of Lovin' Soap posted pictures of her attempt to do this with soap - as far as I know the first person to try it out with soap as the medium. Since then I have done it as well as Holly Port from Lotion Bar Café!

Click here to see the original video reposted by Non ci posso credere. The video is beautifully done! 

Here are my results:

 just poured soap. The colors are made using natural cosmetic clays. I used an essential oil blend for the scent so this one is all natural!
 Gelled Soap 18 hours later
Clay colors
Column cross sections. These are really cool - I think they look like sediment lines.


Cut Bars. There is a lot of variety and the bars from the edges of the mold didn't get much color. These are mostly from the middle of the mold.


Saturday, December 4, 2010

Sugar Cube Video from Soap Queen!

Anne-Marie aka Soap Queen of Brambleberry has made this awesome video illustrating how to make my solid sugar scrubs! She adapted my recipe from the soap queen blog (here) to make these fantastic neapolitan scented scrubs! Get the recipe on the Soap Queen blog and watch the video here:

Make Solid Sugar Soap Scrub from Soap Queen on Vimeo.

Sunday, May 30, 2010

Homemade rose water

This time of year every time I walk out the front door I get the heady waft of of roses at the peak of bloom and sometimes I shut my eyes and breathe deeply lingering for a few moments to imprint the scent on my memory.


I decided to try capturing the delicate scent by attempting some homemade rose water! From what I know of the process I thought a home set up might be do-able and got to work searching the interweb for some methods! I found some things, made a slight modification and went to work with rudimentary household utensils (thought I was, in my mind, acquiring glass do-dads and pipe, rubber stopper and connector thingys and burners like a mad scientist to make something a little more sophisticated - next project!).

TIP: You can use your rose water by itself as a refreshing toner or add 10% witch hazel to make an astringent!

Stuff you will need
• about 8 oz of fresh rose petals - preferably that are chemical free and picked in the morning
If you don;t have roses as a neighbor or see if a local florist will give/sell you old roses (that thye will probably throw out anyway)
NOTE: I made 2 oz of rose water with 8 oz of fresh petals
• double boiler with a steamer
• ramekin or small heat safe dish
• tin foil ( a stainless steel bowl will work better)
• ice
• tap water or distilled water

What to do:
This process will take 3-4 hours depending on how many rose petals you pick.
1) clean the picked petals - mine were covered in insects and spiders so I just filled the pot holding my petals to the top with water to flush critters out.
2) set up your pot. Fill the bottom with water so the steamer pan is about 1 inch above the level of the water. Place the ramekin in the center.
3) Put petals around the ramekin, you can really stuff them in just make sure they sit at or below the level of your ramekin.


4) place a sheet of foil over the top so that it is in a concave shape - you can also use a stainless steel bowl.
5) set water to boil and then simmer - put a few ice cubes on the top of your foil - you will have to keep refilling ice and emptying water so a bowl would indeed be better for this! Just make sure the lowest point of the bowl sits above the ramekin and that it completely seals the top of the pot so that rose water does not escape!
6) You will have to refill rose petals every half hour or so - do not remove old ones. You will already see the rose water in the ramekin after just 30 minutes!You may also have to add more water to the double boiler, but just add a few ounces at a time so it does not breach the bottom of the steam pan. After you have added your last batch of rose petals let the whole thing steam for another hour and then you are done! Discard rose petals into the compost heap or back into your garden soil.
Place the rose water in a sterile glass jar and keep in the refrigerator - lasts about a week.


Has anyone tried making floral water with other types of flowers? If so what did you make and what was your method!

Friday, January 8, 2010

Tutorial: Sweet Treats Mini Soap Chocolates


I always love to give handmade goodies for holidays and I think these little soap chocolates are the perfect Valentine's Day gift for a sweetheart or even friends and co-workers. They are simple and budget friendly! I hope you enjoy it!

Materials:
• 12 oz. of Bright White glycerin soap
• 8 oz. of Naturally Clear plus 4 oz. of Bright White glycerin soap
• two, 2 cup microwave safe glass measuring cups
• Wilton Bite size brownie squares pan
Strawberry Fragrance Oil
Dark Rich Chocolate Fragrance Oil
Non Bleed Red Liquid Color
Brown Oxide Liquid Color
• two, 2 or 4 oz. Plastic Squeeze Bottles
• Rubbing Alcohol in a Spray Bottle
a simmering pan of water (optional)

Directions:
1) Melt 12 oz of white soap in microwave - about 2 minutes. Add 6 drops of Non bleed red color, less or more depending on how light or dark you would like your pink, and 4 ml of Strawberry Fragrance. Set aside
2) Melt 8 oz of clear soap base plus 4 oz. of white soap base in microwave - about 2 minutes, Add 30 drops of Brown Liquid Oxide, more or less depending on how light or dark you would like the chocolate color, and 4 ml of Rich Dark Chocolate Fragrance Oil. 

here are the colors you are looking to get

3) Pour about 1 oz of pink soap into one squeeze bottle and about 1 oz of Chocolate Brown soap into the other squeeze bottle. If the soap starts to set up, place the bottles in a pan of simmering water until the soap is liquid again.
4) Working in only 12 of the mold cavities, make thin lines of soap across the mold in a diagonal motion using one of the soap colors. You may get a little pooling depending on how hot the soap is – this is ok! Repeat in the remaining 12 cavities with the other soap color. Let set for about 5 minutes.

I make the lines across the entire mold but if you are less messy than me,  you can concentrate the lines within the individual cavities. The lines will just be thicker if you do that.

5) Make sure the soap in the glass containers is at about 120 degrees, not too hot to melt the soap and not too cool to look goopy. Let cool or heat as needed. Spray the brownie mold with a generous amount of rubbing alcohol coating all of the soap lines. 
6) Pour the pink soap in the mold cavities with chocolate brown stripes and the chocolate brown soap in the mold cavities with the pink stripes. Spray with rubbing alcohol to remove air bubbles and let set about 1 hour until the soap is completely firm.


7) Pop out of the mold and you are done!

Variation: Once you get the hang of the squeeze bottles you can make other designs such as hearts, swirls or dots.


Packaging ideas:
Stack soaps in a wide mouth glass apothecary jar. Decorate with an antique key to your heart and a handmade heart tag and finish with ribbon!
 
4 soaps fit perfectly in a 3.25 in square by 1 inch box. Add a little paper shred in the bottom of the box, place soaps, and finish with a ribbon and handmade tag.


Add pink wood shred to the bottom of a shallow tin and fill with soaps! What  a nice surprise when the lucky recipient opens the box!


resources:

Friday, December 25, 2009

Mini Gingerbread Houses stand on thier own!

My attempt at this awesome project from Not Martha. My boyfriend and I did this last night for a fun Christmas Eve project. Boyfriend was sick so I had most of the fun but he was a trooper and hung in until they were all done! He is so sweet!

I rolled my dough a bit too thick (note for next time) so they are puffy and don't sit on the rim of the cup properly, but they are delicious and they stand! Success!


 Below we have (from bottom left to back)
Witches House, Bluth Family Model Home, random unfinished house, Jaws house (see shark fin on top), Spike's house (from Mario Bros.), Easy Turf house, Stripe's house (the gremlin), My Country Bungalow, Patty Peppermint's house


If you live in San Diego you may have seen San Diego Charger
LaDainian Tomlinson's commercial for the fake grass EZ Turf. At first it was the Astro Turf house but after a couple of glasses of wine this seemed funnier - not as funny sober but I do love the color.

Friday, December 4, 2009

Tutorial: Baby it's Cold Outside Snowflake Soap

Where did the time go! The holidays are right around the corner and the season has inspired this pretty snowflake soap - perfect for little handmade gifts or to decorate your soap dish! All of the supplies can be bought online and the project only takes about an hour! Enjoy!


Materials: 
• Snowflake 5 piece cookie cutter set (see link below)
• 2-3 oz white soap
• 17 oz clear soap
I love naturally clear and bright white soap base in the Soapylove Collection at Brambleberry!
Super Pearly White Mica
Shredded Iridescent Glitter
Liquid Blue – non bleed
• Fragrance of your choice – I used BrambleBerry's Moroccan Mint for this but one of their holiday fragrances would be lovely as well! How nice would their Fresh Snow fragrance be?!
• 2 cup capacity containers or glass microwave safe measuring cup
• 1 cup capacity pyrex containers or glass microwave safe measuring cup
(if you have two, 2 cup capacity pyrex containers that will work just fine!)
• 9 in. x 9 in. Silicone brownie pan (see link below)
Scale that weighs to a tenth of an ounce
• Clean cutting surface
2 Plastic droppers – one for fragrance, one for soap
• 1/4 Teaspoon measuring spoon
• sprayer with rubbing alcohol
• food thermometer
• cup with just under boiling water
• plastic wrap

Directions:
1)    melt 5 oz of clear soap in 2 cup microwave safe measuring cup – about 1 minute. Add about ¼  teaspoon of shredded glitter and set aside.
2)    melt 1.5 oz of clear soap in 1 cup microwave safe measuring cup - 20-30 seconds. TIP: add a little white soap or more mica to make it more opaque! Add ¼ teaspoon of Super Pearly white Mica.
3)    pour clear soap with glitter into the bottom of the silicone cake pan – spray with rubbing alcohol to remove air bubbles.
4)    pour pearly soap over the clear soap in a thin horizontal and vertical lines about 1 inch apart. TIP: – make sure soap is not too hot at this point or your lines will bleed into each other and you will get a solid sheet of pearly soap.
5)    using your wooden skewer or toothpick start slowly at one corner creating swirls in the soap using long motions in a diagonal to the cake pan. Time permitting do lengthwise lines perpendicular to the cake pan as well. The soap will form a skin quickly so work as fast as possible. No matter what happens the swirls will be perfect! If you have air bubbles spray with rubbing alcohol. Let soap set at room temp for about 20 minutes.

6) Now that the first layer is all set up, we are ready for the second layer! Melt the remaining 12 oz of clear soap in a clean pyrex about 2.5 – 3  minutes
7)  Mix 10 drops of BB liquid non bleed blue plus ¼ teaspoon of super pearly mica – you can add more or less blue to your liking but we want it dark so that there is nice contrast with the pretty swirls you just made. I like the non bleed blue here. After time a bleeding color will muddy up the swirls. Add 6 -8 ml of your fragrance oil. Really scent it well since the first layer is not scented.

8) Spray the first layer of soap thoroughly with rubbing alcohol and pour your blue soap over it – make sure the blue soap is not too hot, you can use the food thermometer to make sure it is about 120 degrees. We don’t want to melt the first layer! Spray with rubbing alcohol to remove air bubbles if necessary. Let that set up for another 20 minutes or so, until it is completely set up.
9)  Yay! Our soap ready for cutting – remove the soap from the cake pan by gently peeling it up starting at one corner, and pulling it away from the cake pan. Lay it on your cutting surface with the swirl side up.
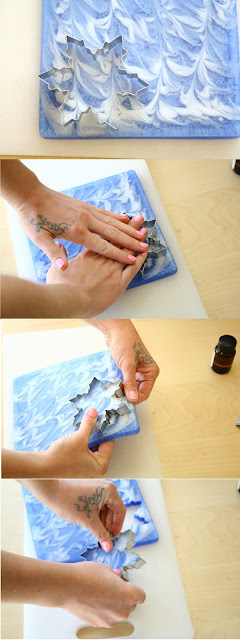
10) Using the 4 inch (the one in the middle) snowflake cutter from the set cut out 4 snowflakes from the sheet. Press on all edges until the cutter is completely through the soap – a small plate works well to press the cutter into the soap.


11) Using the small detail cutter in the set cut six times on each of the six sides. You want the two pointed side of the cutter to be on the same plane as the first indent, and the single pointed side to be facing the center of the snowflake as shown TIP: use the wooded skewer to pop the tiny piece of soap out of the cutter! Do this for all 4 snowflakes

12) Next fill in the cut outs with white soap. First lay out a piece of plastic wrap on your table and gently press the soap onto it, swirl side up. We want a tight seal between the bottom of the soap and the plastic wrap so that we don’t get bleeding on the back of the snowflake.
13) Melt the remaining 1 oz of soap. Lightly spray cut outs with rubbing alcohol.
14) Get the cup of hot water ready. Using a plastic dropper fill the cut outs with white soap. It is ok if you don’t fill them all the way – it looks pretty like that! If you get a little white soap on the face of the snowflake just wipe it away with your finger tip while the soap is still liquid. Make sure to clean the plastic dropper in your cup of hot water!

15) Spray with rubbing alcohol to remove air bubbles. Let set up and let the rubbing alcohol completely evaporate from the surface of the soap.
16) You are finally done – a what a lovely reward! They are pretty from the front and the back!

Save all of the leftover soap – you can use it in another project or re-melt it with a little more blue to use as the second layer of another sheet of snowflake soap!


Shrink Wrap or package in a poly bag with ribbon!
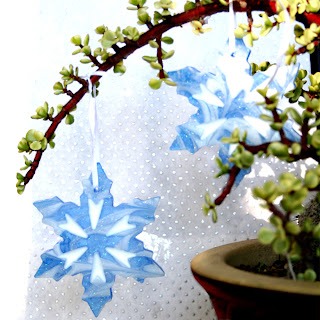
You can even use your wooden skewer to make a hole in the tip of one of the snowflake sides and string a ribbon through it for a pretty “soap ornament”!

Be sure to label it as soap when giving as gifts!

LinkWithin

Related Posts with Thumbnails